Sunday, September 9, 2018

"Something old, something new..."

... Something borrowed, something blue. As the saying goes, I think I have that covered with this kitbash of one of the more iconic plastic structure kits of days gone by. Marketed under the Revel and AHM labels during my impressionable years, the Superior Bakery/Weekly Herald/Operating Engine House has always featured some of the best brick detailing ever to grace a model layout.

I have stashed away several new, untouched kits, as well as some previously kitbashed versions from my teenage years. For the most part, I abhor producing structures per the kit instructions, but I did want to take advantage of the quality of these kits. The prototype structures that I need to build don't necessarily mimic these details, so I decided that I could at least produce something that would serve as a nice background, non-rail-served industry.


Nicely detailed aged brick is a hallmark of these kits. So sad that today's mass producers (I'm looking at you Walther's) roll out the masonry walls that they do. Note that two joints are visible here, but when  painted ultimately blend in very well.
 
Some clean-up work was required to salvage some old pieces. Regrettably then, but thankfully now, it seems that I was partial to Goo back in the day.
 
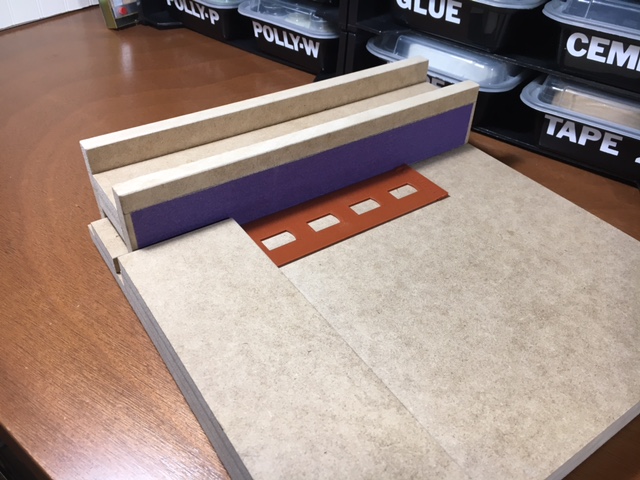
The new blue and yellow walls join the middle reclaimed section, plus a couple of end walls to form a background structure that measures just about 3" x 22". 
 
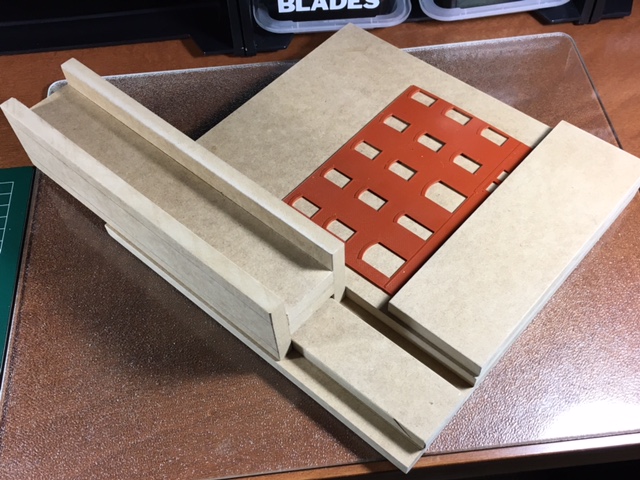
End walls were made from both a new kit and a previously used one. They were  joined with the central portion of the original gable ends so they could be cut to form a parapet. The building footprint was cut from a sheet of .060 styrene and served to help erect the walls at 90 degrees and help pull the front wall assembly together.
 
Gator Board was used as a back wall and interior bracing for it's rigidity and stability. I'm not sure what adhesive is best to merge the styrene with the Gator Board, but I'm thinking Super Z RC-56, otherwise known as canopy glue. Thoughts anyone?... please!
 
Some .060 styrene was used to fabricate the roof and now a decision needs to be reached about its final topping. Since several of my other industrial structures have metal roofs (standing seam or corrugated) it would appear that it's between shingles or tar paper. Shingles could look great, but that's a lot of shingles! Again, thoughts anyone?

The walls dress up pretty nice with a coat of a very dull auto primer and await some weathering. The roof will probably end up with a long clerestory or billboard-type signage to enhance its verticality. Window frames will be decided down the road once the structure's location and ultimate purpose is decided upon.
 
So, what about the "something borrowed" part? Well this idea had rattled around in my head for a few years. I had always been intrigued with a little structure that I saw on Kip Grant's layout and a larger one on Tony Koester's. Turns out Kip had built a cut-down version of Walther's Leviathan Manufacturing, while Tony doubled it up. 

I liked the rhythm that the windows and brickwork created. And the modest depth is perfect for a shelf layout. So I improvised using parts of a model that I always loved to get something similar to one I admire now.  Kip and Tony's finished work is pictured below. My finished photos are still to come.
 
-30-
 
 BONUS:  JUST  ONE  MORE  THING  BEFORE  WE  GO ... 


Wednesday, August 8, 2018

"Wordless Wednesday Wrap-up... Numero Uno"

My relative reluctance to embrace the often-used feature, "Wordless Wednesdays," that many bloggers employ may have been evident in that I dipped my toe into the shallow end by running a photograph of ... words. But while I may have had my tongue firmly planted in cheek, I should provide an explanation of that signage, since I'm always asked about it... even if it is a year later!

It's a sign that I made from some scraps that I had in the garage, most specifically old fence pickets that had been out in the weather for many years. When we replaced some sections of our 6' stockade style fencing, I saved a few pickets just in case I needed some here and there in the future. Well, the future has rapidly rushed by and at this point the next act regarding several hundred feet of fencing will be a total replacement. So little pickets, come to poppa.


The homemade sign measures just under 8" x 60" and graces the more visible side of my workbench. It was designed and built quite quickly out in my garage workshop from entirely on-hand materials, with the exception of the letters.


I showcased the real imperfections of the pickets for 'character and realism.' The 3-1/2" high wood letters were purchased at Hobby Lobby and given a spray of flat black before being glued in place. I chickened out when considering whether to distress them.


I ran each of the four pickets down my table saw, ripping off the rounded face so three would lie flat against a 1/4" hardboard backing for easy gluing and screwing. The fourth was then  further ripped into a suitably proportioned surrounding frame. The backside of each picket is what is actually visible.


Any clean edge of the frame that had been ripped on the saw was given an alcohol and ink wash and blended with the twenty year old fencing better than I could have hoped. 

Full disclosure here. I had originally planned to wash the background in white and the surrounding frame in black to more closely approximate a depot sign, but I decided against it for two reasons. One is that I really liked how this looked as is, especially in contrast against my workbench wall. And two is that I really, really didn't want to screw this up trying to weather and age at a 1:1 scale!


Overall though, I'm pleased with the result and the ambience it contributes to the train lounge. I have built a second, similar one from my last remaining pickets and am contemplating how to finish that, including lettering. But I promise to be more adventurous with that one whenever I do get around to it.

-30-

  BONUSJUST  ONE  MORE  THING  BEFORE  WE  GO... 


Oooops!... seems that some careless CSX track construction caused flooding in this lovely historic town twice within a week. At least it's not on the order of Ellicott City's woes further down the line.
 

Friday, August 3, 2018

"Too hip to be square?... Nope, that not be us!"

Has it really been a year? Well, it has been a rough one for our family, but nevertheless, I simply cannot let the Old Main Line reach "one year ago" on the blog list. So without further ado, allow me to actually post something that has been sitting offline in my drafts folder for quite sometime.

The Garden State Division of the NMRA has conducted several meets featuring "works in progress" or WIPs that have been very popular for both clinicians and attendees. The low key, informal setting is relaxing for the clinician and extremely engaging for the attendee. A real win-win as they say.
 
Craig Bisgeier did a nice clinic on tools and techniques for kitbashing and scratchbuilding. But what really captured everyone's attention was the sanding square that he built to guarantee clean,  square  edges for cut materials.

The sanding jig is about 15" square and is predominantly made of 1/2" MDF. It relies on a glued block as a stop, or fence, set at a 90 degree angle to a sliding sander.

The H-shaped sliding sander sits inside a double track that is routed out of the MDF to guarantee an even, consistent sanding to the 90 degree fence.

Like an excited schoolboy at 3 pm, I dashed right home and built my own with a few modest variations in overall size and features using the same 1/2" MDF material. It's 12" square so I could maximize the use of a 24" x 48" piece of MDF.

Rather than routing out the MDF, I simply used two layers overall to create the tracks. All of the MDF pieces were glued and screwed together for a really strong and rigid bond. Plus I preferred the extra heft that the additional layering gave me for added stability.

I used double sided tape to hold the sandpaper to the slider and actually used two different grades on the two sides for added flexibility.

While squaring up corners is crucial in modeling structures, my main use will be in butting together multiple side pieces since I am replicating three major mill structures that require multiple kits to be kitbashed.

Since this was a relatively easy task, and since I had an excess of clear pine from assorted benchwork adventures, I decided to mass produce a dozen 8" x 8" sanding jigs. I used the leftover 1/2" MDF as a base and 3/4" clear pine for the sander and fence. In a moment of sheer madness, I gifted them to my fellow GSD board members as a gesture of kindness.

Even made a few for lefthanded modelers. We're a full service that aims to please!

The underside shows the screw placement to hold the double layer. The four corner self-adhesive bumpers are reinforced with a dab of Goo for better adhesion.

I believe that there are similar jigs available commercially, and knowing Craig, he probably just wanted to save a few bucks while sticking it to the man. But one must admit, it's a neat, little project. I'm considering a few options on how best to build a second sanding slider that will give me a 45 degree angle for corners.

But that's it for now. Back to life's challenges. My hope is to have some energy to more regularly update this blog, because although postings have seriously lagged, work on the layout has only modestly been affected. Later!

-30-
 
  BONUS:  JUST  ONE  MORE  THING  BEFORE  WE  GO ... 


We may live just 25 miles from the media capital of the world, but the editors of a local monthly may want to work on tweaking some of their headlines. Duh!... ya think?