Sunday, May 31, 2015

"Three elements... Firmness, commodity, delight."

Marcus Vitruvius was a legendary first century Roman author, architect and army engineer who wrote the Ten Books of Architecture. I read the first one. In it, he emphasized that any built structure required 'firmitas, utilitas and venustas' for it to be considered a legitimate architectural work. The popular Anglican translation is 'firmness, commodity and delight' which further translated means that any project must have strength; must be useful; and must be beautiful. Seems like pretty straightforward stuff, but not always followed.

I have approached all of my layout design and construction with this in mind, and the lower level backdrop was no exception. My plan called for (3) 4' x 8' sheets of .040 styrene to be cut into (12) 12" x 96" lengths which would be enough for the entire run. I wanted a system that would be stable, adaptable and attractive... pretty much those same three elements that the V man would have mandated had he been playing with trains instead of building aqueducts.

Plastic end caps were screwed into place along the entire run of the lower deck to accept the styrene backdrop in the same fashion as was done at the former doorway and peninsula.

The channels bend gracefully in corners allowing the styrene backdrop to follow easily. A Velcro square will be used on each riser to hold the top portion in place while providing for emergency access to the chase behind the lower backdrop... you know,  just in case.

The end caps were jointed to correspond with that of the bench work to maintain the sectional feature of the entire construction... again,  just in case.  

Styrene sections were butted together and reinforced with a 3" wide backer that was stapled in place. A Velcro square is visible at the top. 

Despite the channel, Velcro and styrene backing, the butted ends of the styrene did not sit uniformly, leaving a very visible seam in some locations.

Double-sided carpet tape was mounted on a 2" wide piece of styrene and slipped into place behind the butted sections and in front of the backer to provide a clean seam and a solid, but reversible bond.

The carpet tape did the trick nicely and the seams were barely noticeable at this point. The installed sheets of styrene were now ready to be carefully primed and painted, in place, with a 3" roller.

The installation of the backdrop more clearly illustrates the varying depths of each deck around the full run of the layout.

Although in different planes, the lower backdrop blends effortlessly with that of the upper which is mostly the room's sheet rocked walls.

Two decks, check. Two backdrops, check. And all the bells and whistles still to come!

The lower level backdrop really went together nicely and without any surprises. The seams became all but invisible once they were primed and painted over, yet the entire backdrop is relatively free-floating. I call it 'temporarily permanent.'

The Romans may have invented concrete, but I'll stick with styrene. After all, it's got integrity, is very useful and can be quite handsome.

-30-
 
  BONUS:  RHETORICAL  QUESTION  OF  THE  DAY...  
 
Did you know? Contrary to some  of my i-Phone photographs, the backdrop is fairly muted and was painted using Benjamin Moore #806 'Breath of Fresh Air' to achieve a light blue/gray look in person.

Friday, May 29, 2015

"Friendly Fridays... Just a bizarre dream?"

So, I'm the only passenger in a car rolling along an undulating country road in the absolute middle of Nowhere, VT. The deep baritone voice of the driver is recounting story after story of model railroad legends and lore, while lamenting the lack of a nearby McDonalds. Approaching what looks like a deserted railroad crossing, he ignores the admonition of the GPS and pulls onto a graveled area with a caravan of other cars. It's a veritable oasis amidst the endless fields.

We get out to examine an old depot, but a wildly gesticulating figure bellows to us from across the road... something about selling model railroad equipment from a shipping container in his backyard. Well of course he is. What else would that big fellow be doing here in the middle of Nowhere, VT?

An unseen force descends upon a dozen middle-aged men who march zombie-like towards the unseen container and disappear around the corner of the modest ranch like lemmings over the proverbial cliff. It's the only home within 360. But the deep-voiced driver sees a photo opportunity and focuses on the old railway depot for a potential magazine article. I stand smack in the middle of the road assessing the circumstances.

"Yes, this is all very logical," I assured myself. "Nothing unusual here."

My chauffeur, and regular hobby columnist, has identified a potential article idea in Leicester Junction, VT. You can see the finished product in the May 2014 issue of Model Railroader. Turns out that maybe the shipping container's owner was a marketing genius!


Jim Koerner emphasizes to a bemused  Henry Freeman that the old Rutland RR is now inadequately maintained by the Vermont Railway, while Jerry Dziedzic looks more interested in catching up to Dave Olesen, John Rogers and Ted Pamperin. "C'mon guys, the shipping container is just around the corner. Hurry!"

Here is undoubtedly the best stocked hobby shop/shipping container anywhere. Pricing was very negotiable and selection was extensive, especially if you were interested in New England road names. "Anyone see any B&O stuff?  ...  Damn!"

 
Once the dust had settled, literally, we learned that this  entrepreneur was actually handling the estate of his late father-in-law who had been an avid hobbyist. It was a Field of Dreams moment where the universe aligned perfectly putting person, time and place unexpectedly together.

What did I pick up? That's a story for another day. "But it's a really good story!"

-30-

  BONUS:  RHETORICAL  QUESTION  OF  THE  DAY... 

True or false? The quote in today's final line was spoken by farmer Ray Kinsella (Kevin Costner) to author Terrance Mann (James Earl Jones) in the film referenced above.

Tuesday, May 26, 2015

"The plan actually seems to be working..."

In the world of architecture and construction, the theory goes something like this. Ideally, a sketch is turned into a scaled drawing which in turn is expanded into a construction document. If all goes well, the project is built according to the architect's vision by a diligent contractor for a satisfied client. Since I wear all three hats on this project, I did take some shortcuts and work some things out in my head, figuring that all three parties should remain in communication throughout the process anyway! 

While I had a general idea of how the second deck would be integrated with the structure of the first deck, I did realize that a few different conditions existed that would require slightly different details. How the second deck would be cantilevered in certain locations, and how much it would be cantilevered, were the biggest issues.

The second deck was constructed using  1" x 2" clear pine and supported with 19" long risers. The frames of each deck mirror one another so the risers align with each cross member. The lower deck here is 14" deep while the cantilevered upper deck is 16" deep.

The upper deck is very rigid. It is anchored into the wall studs and supported by the riser. The amount of acceptable cantilever could have been determined through a complex math equation which had a lot of neat symbols that I didn't understand, so I guessed.

The right side shows an upper deck that is the full 20" deep while the lower deck is only 10". The styrene peninsula backdrop required that risers be used in the rear as an anchor and toward the front as cantilever support.

Because the styrene backdrop at the peninsula did not provide the ability to anchor as the wall studs did, wider 1" x 6" and 1" x 4" risers were utilized. The changing depths of the two decks as they round the end of the peninsula are evident here.  The white end cap will hold the lower level backdrop.

Note the use of a few stamped metal L-brackets on rear risers to help support the upper deck on the left along the peninsula and on the right across the former doorway. In each case I needed maximum depth for the lower deck and the styrene backdrop could not support any type of anchor. The lower decks here are 18" and the upper are 12".

A close-up of the stamped L-brackets show how they are mounted on a rear riser that is 'flat' to the other risers. Adjacent risers provide the clearance that the backdrop will need.

You may have noted by now that I did have a bit of a formula for the relationship between the two decks, and it did not involve anything beyond kindergarten math. While the original single deck was 20" deep, I determined that the sum of the two decks at any given location would equal 30" giving me both an acceptable cantilever support and a consistency whereby one deck could handle substantial modeling/operating activity and the other was merely ROW.
 
I hope that I have explained this clearly. Regardless, it went up and has remained up, very rigid and secure, awaiting the installation of the backdrop which we'll cover shortly.
-30-
 
  BONUS:  RHETORICAL  QUESTION  OF  THE  DAY... 
 
Seriously, a show of hands here. Who honestly saw this coming?

Friday, May 22, 2015

"Friendly Fridays... Bottoms up, literally!"

A recent Garden State Division meet was held in my old stomping grounds back in New York. I was anxious to have lunch at one of my old haunts, a favorite place for my high school group to gather during our summers home from college. I promised some of the GSDers an excellent neighborhood tavern with cold pitchers of beer, juicy  cheeseburgers and gooey pizza. Yes sir, got your four basic food groups right there.

But, OMG! The Road House had been renovated... went downright upscale with seared mahi-mahi tuna, broccoli rabe and Tiramisu. Tiramisu? I doubt that would have been a big seller forty years ago to bunch of frat boys. Regardless, it was ultimately about friendly company, and Bruce DeYoung, Chuck Diljack, Marc Moritz and I had a great time. Good modeling buddies and lots of laughs.

This photo was sent to my mates after an enjoyable lunch. I toasted their company, but the photo has nothing to do with our drinks. Look closely to see the trauma I experienced, unbeknownst to them, throughout the entire meal. I quietly snapped this ongoing pose while 'checking messages' on my iPhone.

Apparently part of the renovation included the installation of a gas-fueled fireplace for ambience. On this particular day, the system required the charms of a full-fledged, card-carrying plumber who contributed in his own way to my overall dining experience... a room with a view, so to speak. Since he was only in my line of sight, I spared the others and suffered in silence while longing for the good old days before Tiramisu and anything drizzled in balsamic reduction.

Have a great holiday weekend everyone. Cheers and happy dining!

-30-

  BONUS:  RHETORICAL QUESTION  OF  THE  DAY... 
 
Unfortunately union rules specifically prohibit the inclusion of this  feature on holiday weekends. We apologize for the inconvenience.

Wednesday, May 20, 2015

"I'm converting... But still saying my prayers."

The allure of the multi-deck's long run and generous separation between key LDEs was tugging at me. I studied what other modeler's had done with that style... construction, dimensions, finished photos, etc. But now I was especially concerned about another kind of separation, that of the vertical kind, with a ceiling that only afforded a clearance of 6'-3".

I checked with friends and on-line acquaintances about the dimensions that they used and their relative success for viewing and operating. My mandate was not to be too low for my lower deck, lest my cranky knees and back punish me for sheer stupidity. I did know that the relative depth of my decks would be modest, between 8-20" which would minimize the necessary vertical separation. A cardboard mock-up on bookshelves confirmed that.

And key to all of this re-thinking was that ultimately the objective was to double the mainline, not double the layout. ROW areas might be as narrow as 8-12".

A quick sketch showed what I could get by lowering the existing deck and trimming the valence. The upper deck would be cantilevered off of the wall with a riser for support. Depths of the two decks would fluctuate so that key operating areas would be staggered and viewing would be maximized.

Because the bench work was built in sections, it could be unscrewed and lowered in step-by-step fashion using clamps and the magic tripod. Thankfully, the peninsula backdrop could hang free from the ceiling due to the system used to install it. (Take that Murphy's Law!)
 
The sections were lowered from the existing ledger strip at a consistent dimension through the use of an autographed piece of scrap wood. More on that valued pine spacer below. 

The existing legs needed to be shortened so each was removed one-at-a-time and trimmed at the table saw, before going back in place. The lower deck would need a new backdrop of its own, and I had some ideas, but we'll cross that bridge when we get to it.

So, there you go. In for a penny, in for a pound. My modest single deck with the cramped towns was growing up. Yet I do keep hearing my mother's admonition from my childhood,"Your eyes might be bigger than your stomach."
 
We'll have a quick 'Friendly Friday' for the start of Memorial Day weekend and then get back to major construction next week. Geez, am I really doing this?

-30-
 
  BONUS:  RHETORICAL  QUESTION  OF  THE  DAY... 
 
Did you know? When a friend relocated to North Carolina his massive B&O layout had to be dismantled and tossed into a dumpster over the course of several weekends. I picked through the used framing with the intention of keeping the B&O lineage in my bench work, while paying homage to this former layout. The scribbling on one piece said, "Thanks Jim. Magnolia Cut-off. Henry Freeman."... And my wife says that I'm not sentimental!

Friday, May 15, 2015

"Friendly Fridays... Lehigh & Susquehanna RR."

Directions to Wayne Sittner's secluded home not far off of the New York State Thruway include very specific details for turns onto an unmarked road into an unmarked driveway. After negotiating the winding trail under a forested canopy, the retired art teacher's home appears in a clearing, sitting on a shallow hill overlooking a large spring-fed pond with it's scenic man-made island.

The Frank Lloyd Wright-inspired design reflects the natural surroundings that Wayne and his wife cherish. The low horizontal lines of the home's wood and fieldstone siding and the generous amount of windows blend with the manicured hedges and fieldstone retaining walls. Although visitors have come to see the model railroad, a tour of the home and its landscaped property is an unexpected treat. It leaves everyone wondering, 'Where in the world does Wayne find the time and energy to achieve so darned much?'

Wayne has depicted the area around Wilkes-Barre, PA that he remembers from his childhood. His hand painted backdrops compliment the scratch-built structures on the narrow bench work.

Various 'fallen flags'  conducted business operations in the Wyoming Valley region and Wayne changes out his roster and even some structures to depict the different operations.

The 9' x 40' railroad only occupies a small portion of the basement which also houses a classic Lionel toy train 'set-up' with all of the smoke, bells and whistles, literally, plus assorted collections of military miniatures, antique dolls and vintage metal signs.

Each scene that is faithfully modeled comes with  fond childhood memories and accompanying stories, usually involving some sort of mischief.

Here is an example of a track side building that can be changed out as Wayne has built various railroad prototypes with the same 'footprint.'

Determining exactly where the layout ends and the backdrop begins is as difficult in person as it is in photographs. The artist's understanding of shading, shadows and perspective pays real dividends in this regard.
 
The Lehigh & Susquehanna RR was featured in Great Model Railroads 2014. Article author Paul Dolkos does a wonderful job of narrating Wayne's story, calling it an 'autobiography or self portrait.' I'll refer to it as 'a diary in 3D.' His artistry and attention to detail make the layout one to study. Weathering techniques are top-drawer and the familiarity with his subject gives Wayne an advantage in conveying a genuine flavor for time and place.

You can learn more from Wayne himself in a couple of weeks. He will be a clinician at the New England/Northeast RPM in Collinsville, CT, May 29-30th. As for us, this coming week we'll get back to some decisions regarding track plans and the resultant construction issues. Stay tuned.
 
-30-
 
  BONUS:  RHETORICAL  QUESTION  OF  THE  DAY... 
 
 
Did you know? Seven railroads served the Wyoming Valley area in the 1950's including: the Erie; Central of New Jersey; Delaware & Hudson; Lehigh Valley; Delaware, Lackawanna & Western; Pennsylvania; and the Lackawanna & Wyoming Valley electric line.

Wednesday, May 13, 2015

"Dreaming of trains... The jazz version."

While I finagle with track plans, contemplate the relative benefits of single deck vs. multi-deck and digest the much-appreciated thoughts of friends and readers, I do so listening to soft jazz on one of my cable provider's 'Music Choice' stations. In fact, unless I have a ballgame on when I'm downstairs, the flat screen is always tuned to the relaxing instrumental sounds of, among others, The Rippingtons, Acoustic Alchemy, Peter White, Chris Botti, Earl Klugh or David Benoit.

It's particularly relaxing to be at my drawing board, or at my computer or working on the layout to this music. One artist with whom I was not familiar, but who has grown to be a favorite, is guitarist Ken Navarro. Ironically, one of his most popular albums is entitled, Dreaming of Trains. Now that's  kind of a neat coincidence! But there's more.

Released in 2010, the album features the title cut, plus hits like, 'The Stars, The Snow, The Fire,' 'Self Propelled' and 'Shared Air.' The artist's current album is 'Ruby Lane,' with hits as the title cut and 'Running Toward the Sun.' It also contains, "Westbound and Rolling!"


Influenced by the likes of Pat Metheny, Ken was born in Lafayette, Indiana, but it is his current place of residence that makes his inclusion on this unusual entry most appropriate.

Duffy particularly enjoys chilling downstairs to soft jazz, while Stormy, Chief of Security in the mold of Barney Fife, remains upstairs dutifully policing all doors and windows. 

I don't know what the derivation of that album's title is, or whether he has any particular interest in trains. But, according to the bio notes that run on screen during an artist's song, Ken Navarro currently resides in... drum roll please... Ellicott City, MD! I knew I liked this guy. But that's wild. What are the odds?
 
If you are curious, you can check out selections from all of his albums at his website here. I think you'll enjoy his richly layered tracks and uplifting, soulful melodies. Duffy and I certainly do. See you Friday with our next installment of that day's regular weekly feature.
-30-

  BONUS:  RHETORICAL  QUESTION  OF  THE  DAY...  
 
Did you know that Ken Navarro occasionally performs at Baldwin's, the former B&O depot in Sykesville? I just may need to get there next time. Take a listen...


Friday, May 8, 2015

"Friendly Fridays... All the usual suspects!"

If  the weekly feature, 'Friendly Fridays,' is dedicated to celebrating the kindness and hospitality of the hobby's participants, then today's installment needs to be noted with an exclamation point! Northern New Jersey is losing a longtime friend, operator and helper in Tom Callan who is relocating with his wife cross-country to be near his married daughter in the Lake Tahoe area.

But if it wasn't bad enough that the informal North East New Jersey Modeler's Alliance was bidding a fond adieu to such a dependable friend, that dependable friend was a regular vendor at railroad shows who ran Short Line Hobbies out of his basement. To say that he may need a bit of help packing is akin to Bob Uecker declaring that the pitch was, "juuuust a bit outside."

Twelve intrepid souls met one weekend morning earlier this winter to make quick work of this task.  Or so we hoped. Tom did his part, setting up a well-fortified breakfast of caffeine and assorted sugar-coated carbohydrates laced with Aleve.

One man's chaos is another's organization! My first visit to Tom's home confirmed why he may not have had a basement layout of his own. But there was a method to this madness.

Tom explains to the crew the best method of negotiating the low basement ceiling while carrying boxes around the narrow aisles. Protective helmets? Recommended, but optional.

Look carefully and you'll note that all bins, boxes and containers  were color-coded, indicating their priority, packing order and relative level of toxicity. The sharper crew members quickly realized which colors signified the heavier items. 

Tom knew the contents of every container, whether see-through or not. He knew exactly where everything was and where it should go. The mad scientist was pure genius!

Twelve relatively able-bodied men negotiated the narrow basement stairwell several hundred times before it was suitably emptied to Tom's satisfaction. Then the garage doors were opened! At least this was on grade.

Tom directs a very organized loading into two PODS of which he maximized every square inch. He had prepared numerous plywood bulkheads that divided and secured the stacked cargo. Here, Ted DiIorio and Dave Ramos play 'Rock, Paper, Scissors' to see who takes the next trip back to the basement, while Tom Schmeider proves that he indeed "can do this with his eyes closed."
 
All of the group will miss the Watertown, MA native whose penchant for fine scotch seemed to enhance his abilities at any work or operating session. He was my personal supplier for sheet styrene, in much the same manner that Ellis Boyd Redding was Andy Dufrene's go-to guy in The Shawshank Redemption. He was a man that knew how to get things!

Good luck Tommy boy. Our loss is the west's gain. But we'll see you again, operating somewhere, fine blended scotch and all.

Next Friday we'll return to railroad porn featuring another layout from our infamous road trip throughout upstate New York and New England. But first, this coming week, the continuing mis-adventures of track planning!
 
-30-
 
  BONUS:  RHETORICAL  QUESTION  OF  THE  DAY... 
 
True or false? Tom lovingly refers to his daughter as 'The Princess.'

Thursday, May 7, 2015

"Double your pleasure... Double your run."

Obviously if a modeler with a single deck layout is unhappy with separation and run, he must revisit the multi-deck concept. I say revisit, because I had given it consideration prior to beginning this project, but ultimately decided against it.

I have all but memorized Tony Koester's book on the subject and have visited and operated on some great ones. But I've never quite been a fan of the multi-deck for my purposes. At least I don't think so. I was heartened when I read of Marty McGuirk's dismantling of his upper level and especially related to his reasons why, which he mentioned in his blog, and expounded upon in an issue of Model Railroad Hobbyist.

I do like having one deck at optimal working, viewing and operating height rather than two at compromised ones. I dislike having to worry about more lighting... and I do have to acknowledge the modest ceiling height with which I'm working. But most of all, I just prefer the look, or presentation if you will, of a single deck.

But I enlisted the help of Bob Sprague, planner extraordinaire, in a what-if, why-not scenario. I figured it's worth the beer that he charges! Hang on, here we go.

This is the upper level. The multi-deck layout plan is a point-to-point one with two major LDEs per deck. The helix forces a change in direction in this out-and-back format and is of a 'backbone' or 'spine' style. The spine serves as both support and backdrop and the loops alternate between running on the inside and outside of the spine. This alternate format provides about 8" of vertical separation so the outside loops can be sceniced. Radii are 36" and 28" respectively. Ted DiIorio details this type of helix on his blog.

This is the lower level. The depth of each deck is staggered to maximize viewing, eliminate congestion and minimize scenicing. The distance between LDEs in this plan is generous. Mainline run increases from about 90' of the single deck to almost 220' for the multi-deck.
 
To be fair to Bob, he urged a plan that utilized the helix for staging areas with return loops and consistent direction, but it required a two-level gate across the 24" entry which is a feature I really dislike. That's it for now. A lot to think about. Wouldn't mind getting some viewpoints from you all out there! Do comment.

-30-
 
  BONUS:  RHETORICAL  QUESTION  OF  THE  DAY... 
 
Did you know that you can learn more about the work of  Marty McGuirk , Bob Sprague and Ted DiIorio by clicking on the sidebars for Central Vermont Railway, Annapolis Junction Railroad and Ma & Pa Railroad respectively?

Tuesday, May 5, 2015

"Improved?... The final track plan."

It was back to the drawing board, literally, after assessing my earlier track plan which I determined lacked adequate separation between those pesky Layout Design Elements. In consideration of my fondness for the areas that I had researched and planned, I decided to extend the layout into the finished living area with as little intrusion as possible.

I secured preliminary approval from the still-in-office Senior VP of Real Estate Distribution and Utilization with the stipulation that this would be considered 'Phase II.' This construction could not, should not and would not, proceed prior to there being significant progress made in the main layout room first. Fair enough. No complaints here.

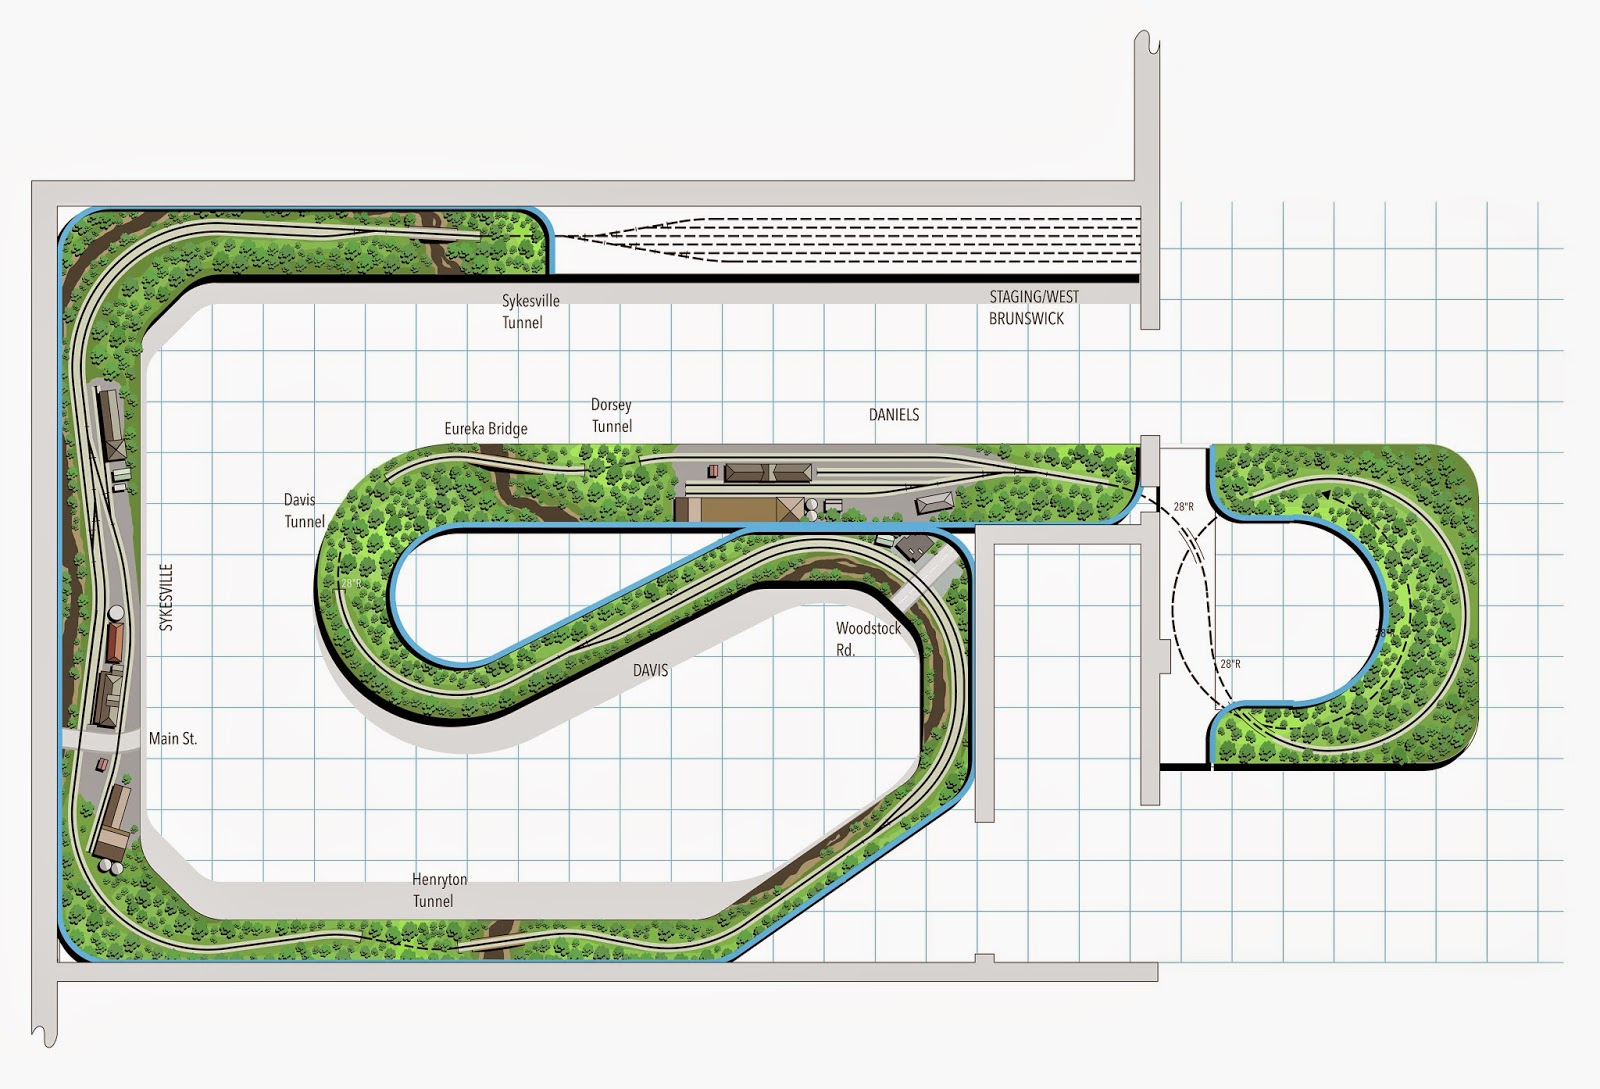
While the first three major LDEs remained the same, Davis Siding was moved further west from the end of the peninsula to the area formerly holding Sykesville. The end of the peninsula can now be sceniced with the Eureka Bridge and Davis Tunnel (not drawn) and begin to more accurately represent the distance between Daniels and Sykesville.

The farming community of Sykesville is moved outside of the layout room via Henryton Tunnel. The new area includes a buffered staging 'pit' that does allow for through-running, plus the State Hospital spur which could not be accommodated in the earlier scheme. Entry to the layout is via a flip-up, nod-under archway @ 5'-6".

I'll need a little bit of time to really evaluate this, move some furniture around in the 'man cave' and get a true idea of how viable this is. I would really like to keep Sykesville because it represents a different aesthetic from the other LDEs. The others are all mill towns sitting in the river valley, while Sykesville begins to suggest the rolling hills of central Maryland. Plus, the different consignees offer enhanced operations. We'll see.

But For Thursday, we'll have a track plan that really represents a significant departure... and it's in color and fully rendered. Woooo hoooo! See you then.

-30-
 
  BONUS:  RHETORICAL  QUESTION  OF  THE  DAY... 
 
Did you know that Cinco de Mayo is not a celebration of Mexican independence, but one of unlikely victory over the French army at the Battle of Puebla in 1862? So...  "Happy Battle of Puebla Day!"
"You're welcome!"


Sunday, May 3, 2015

"Well knock me over with a feather..."

I'm not sure what was more surprising a couple of birthdays ago. The fact that my wife and daughter didn't update my wardrobe with stylish fashion that I would never buy myself, or the fact that they ventured into the realm of model railroading. Model Builder software caught their eye, and although my architectural schooling came pre-computer age, this apparently looked like something I might be able to handle.

Fortunately, the software does provide the user an immediate level of mediocrity with some fairly easy commands. Part Power Point, part Photo-Shop, it's a combination of photographic images and drawn ones in three basic categories: 1) siding and roofing materials; 2) doors and windows; 3) miscellaneous details.

The examples shown below are just some things I played around with during the learning process. They are actually photos taken of board-mounted print-outs and are slightly distorted, but they will suffice for our purposes here.


The very first attempt at designing a structure yielded a generic  office building one might find in any present-day corporate park. My practice taught me how to layer siding materials, stretch, shrink and duplicate windows, and most importantly, add shadows to give the structure depth and definition.
 
I switched gears and thought back to the old AHM farmhouse kit. Using appropriate materials for the siding and roofing, I 'sketched out' something like it, again emphasizing shadows to bring the façade into 3D territory. The electric meters are one of many add-on photos that can be layered in.
 
I combined Model Builder stone, brick and clapboard siding options to visualize a New England-type structure, like those produced by South River Modelworks. Details that can be pulled from the library include the scuppers, patched roofing using two different versions of corrugated panels and the black 'paint' for holes in the garage door. The upper windows were created by cutting the lower windows in half and adding a sill.
 
My city warehouse utilized the prompt to duplicate rows and columns, while two different, but similar brick patterns were used to differentiate between the body and pilasters of the building's facade. Again, shadows play a large role in defining the different surfaces, while the black and white band was put in place awaiting signage that was unfortunately not part of this software package.

Each design I conjured up built upon an earlier one. My trackside building uses contrasting brick to suggest patched areas, while the windows emphasize their disrepair or complete abandonment. I could actually see blending this in with some Kings Mill products for a customized backdrop.

I'm not sure if I'll ultimately end up using any of this software capability on the layout. Although Model Builder markets the product for the creation of paper buildings, I'm more inclined to use it in backdrop applications and as study models before scratch building.

The paint program does offer modelers a quick check to see how various color schemes may work and users can also mass-produce their own roof and siding textures. I will be experimenting with this by printing out on textured paper and on various shades of light gray to gauge the different effects. For info on Model Builder go to their website here.

Tuesday we'll look at some alternative 'final' track plans and then move into some more construction in the days after. But I need some feedback on track plans, people! Please, don't be shy.
 
-30-
 
  BONUS: RHETORICAL  QUESTION  OF  THE  DAY...  
 
True or false? The author typically receives gifts of stylish jeans that are too low on the hips and fitted shirts that are too tight in the armpits for some strange reason.