Sunday, September 9, 2018

"Something old, something new..."

... Something borrowed, something blue. As the saying goes, I think I have that covered with this kitbash of one of the more iconic plastic structure kits of days gone by. Marketed under the Revel and AHM labels during my impressionable years, the Superior Bakery/Weekly Herald/Operating Engine House has always featured some of the best brick detailing ever to grace a model layout.

I have stashed away several new, untouched kits, as well as some previously kitbashed versions from my teenage years. For the most part, I abhor producing structures per the kit instructions, but I did want to take advantage of the quality of these kits. The prototype structures that I need to build don't necessarily mimic these details, so I decided that I could at least produce something that would serve as a nice background, non-rail-served industry.


Nicely detailed aged brick is a hallmark of these kits. So sad that today's mass producers (I'm looking at you Walther's) roll out the masonry walls that they do. Note that two joints are visible here, but when  painted ultimately blend in very well.
 
Some clean-up work was required to salvage some old pieces. Regrettably then, but thankfully now, it seems that I was partial to Goo back in the day.
 
The new blue and yellow walls join the middle reclaimed section, plus a couple of end walls to form a background structure that measures just about 3" x 22". 
 
End walls were made from both a new kit and a previously used one. They were  joined with the central portion of the original gable ends so they could be cut to form a parapet. The building footprint was cut from a sheet of .060 styrene and served to help erect the walls at 90 degrees and help pull the front wall assembly together.
 
Gator Board was used as a back wall and interior bracing for it's rigidity and stability. I'm not sure what adhesive is best to merge the styrene with the Gator Board, but I'm thinking Super Z RC-56, otherwise known as canopy glue. Thoughts anyone?... please!
 
Some .060 styrene was used to fabricate the roof and now a decision needs to be reached about its final topping. Since several of my other industrial structures have metal roofs (standing seam or corrugated) it would appear that it's between shingles or tar paper. Shingles could look great, but that's a lot of shingles! Again, thoughts anyone?

The walls dress up pretty nice with a coat of a very dull auto primer and await some weathering. The roof will probably end up with a long clerestory or billboard-type signage to enhance its verticality. Window frames will be decided down the road once the structure's location and ultimate purpose is decided upon.
 
So, what about the "something borrowed" part? Well this idea had rattled around in my head for a few years. I had always been intrigued with a little structure that I saw on Kip Grant's layout and a larger one on Tony Koester's. Turns out Kip had built a cut-down version of Walther's Leviathan Manufacturing, while Tony doubled it up. 

I liked the rhythm that the windows and brickwork created. And the modest depth is perfect for a shelf layout. So I improvised using parts of a model that I always loved to get something similar to one I admire now.  Kip and Tony's finished work is pictured below. My finished photos are still to come.
 
-30-
 
 BONUS:  JUST  ONE  MORE  THING  BEFORE  WE  GO ... 


Wednesday, August 8, 2018

"Wordless Wednesday Wrap-up... Numero Uno"

My relative reluctance to embrace the often-used feature, "Wordless Wednesdays," that many bloggers employ may have been evident in that I dipped my toe into the shallow end by running a photograph of ... words. But while I may have had my tongue firmly planted in cheek, I should provide an explanation of that signage, since I'm always asked about it... even if it is a year later!

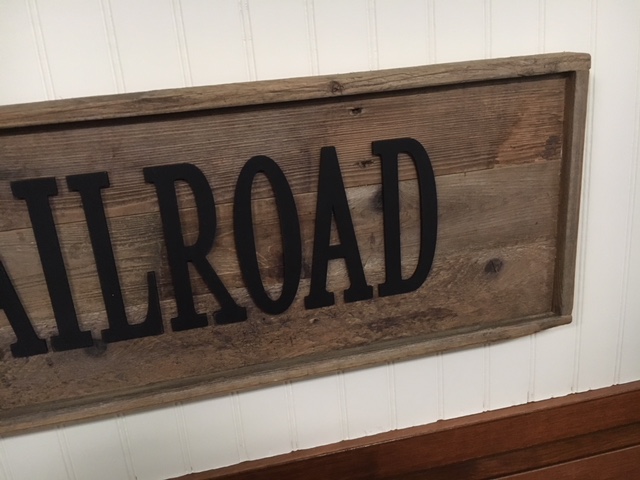
It's a sign that I made from some scraps that I had in the garage, most specifically old fence pickets that had been out in the weather for many years. When we replaced some sections of our 6' stockade style fencing, I saved a few pickets just in case I needed some here and there in the future. Well, the future has rapidly rushed by and at this point the next act regarding several hundred feet of fencing will be a total replacement. So little pickets, come to poppa.


The homemade sign measures just under 8" x 60" and graces the more visible side of my workbench. It was designed and built quite quickly out in my garage workshop from entirely on-hand materials, with the exception of the letters.


I showcased the real imperfections of the pickets for 'character and realism.' The 3-1/2" high wood letters were purchased at Hobby Lobby and given a spray of flat black before being glued in place. I chickened out when considering whether to distress them.


I ran each of the four pickets down my table saw, ripping off the rounded face so three would lie flat against a 1/4" hardboard backing for easy gluing and screwing. The fourth was then  further ripped into a suitably proportioned surrounding frame. The backside of each picket is what is actually visible.


Any clean edge of the frame that had been ripped on the saw was given an alcohol and ink wash and blended with the twenty year old fencing better than I could have hoped. 

Full disclosure here. I had originally planned to wash the background in white and the surrounding frame in black to more closely approximate a depot sign, but I decided against it for two reasons. One is that I really liked how this looked as is, especially in contrast against my workbench wall. And two is that I really, really didn't want to screw this up trying to weather and age at a 1:1 scale!


Overall though, I'm pleased with the result and the ambience it contributes to the train lounge. I have built a second, similar one from my last remaining pickets and am contemplating how to finish that, including lettering. But I promise to be more adventurous with that one whenever I do get around to it.

-30-

  BONUS:  JUST  ONE  MORE  THING  BEFORE  WE  GO... 


Oooops!... seems that some careless CSX track construction caused flooding in this lovely historic town twice within a week. At least it's not on the order of Ellicott City's woes further down the line.
 

Friday, August 3, 2018

"Too hip to be square?... Nope, that not be us!"

Has it really been a year? Well, it has been a rough one for our family, but nevertheless, I simply cannot let the Old Main Line reach "one year ago" on the blog list. So without further ado, allow me to actually post something that has been sitting offline in my drafts folder for quite sometime.

The Garden State Division of the NMRA has conducted several meets featuring "works in progress" or WIPs that have been very popular for both clinicians and attendees. The low key, informal setting is relaxing for the clinician and extremely engaging for the attendee. A real win-win as they say.
 
Craig Bisgeier did a nice clinic on tools and techniques for kitbashing and scratchbuilding. But what really captured everyone's attention was the sanding square that he built to guarantee clean,  square  edges for cut materials.

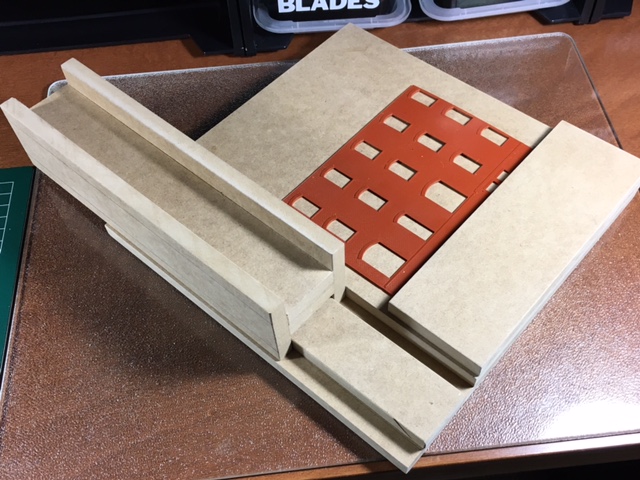
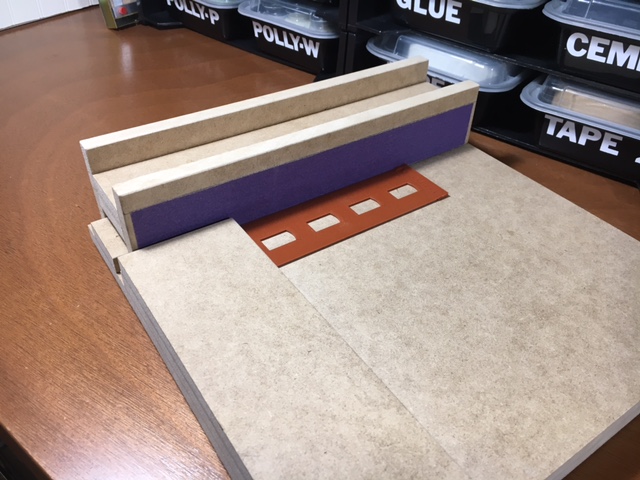
The sanding jig is about 15" square and is predominantly made of 1/2" MDF. It relies on a glued block as a stop, or fence, set at a 90 degree angle to a sliding sander.

The H-shaped sliding sander sits inside a double track that is routed out of the MDF to guarantee an even, consistent sanding to the 90 degree fence.

Like an excited schoolboy at 3 pm, I dashed right home and built my own with a few modest variations in overall size and features using the same 1/2" MDF material. It's 12" square so I could maximize the use of a 24" x 48" piece of MDF.

Rather than routing out the MDF, I simply used two layers overall to create the tracks. All of the MDF pieces were glued and screwed together for a really strong and rigid bond. Plus I preferred the extra heft that the additional layering gave me for added stability.

I used double sided tape to hold the sandpaper to the slider and actually used two different grades on the two sides for added flexibility.

While squaring up corners is crucial in modeling structures, my main use will be in butting together multiple side pieces since I am replicating three major mill structures that require multiple kits to be kitbashed.

Since this was a relatively easy task, and since I had an excess of clear pine from assorted benchwork adventures, I decided to mass produce a dozen 8" x 8" sanding jigs. I used the leftover 1/2" MDF as a base and 3/4" clear pine for the sander and fence. In a moment of sheer madness, I gifted them to my fellow GSD board members as a gesture of kindness.

Even made a few for lefthanded modelers. We're a full service that aims to please!

The underside shows the screw placement to hold the double layer. The four corner self-adhesive bumpers are reinforced with a dab of Goo for better adhesion.

I believe that there are similar jigs available commercially, and knowing Craig, he probably just wanted to save a few bucks while sticking it to the man. But one must admit, it's a neat, little project. I'm considering a few options on how best to build a second sanding slider that will give me a 45 degree angle for corners.

But that's it for now. Back to life's challenges. My hope is to have some energy to more regularly update this blog, because although postings have seriously lagged, work on the layout has only modestly been affected. Later!

-30-
 
  BONUS:  JUST  ONE  MORE  THING  BEFORE  WE  GO ... 


We may live just 25 miles from the media capital of the world, but the editors of a local monthly may want to work on tweaking some of their headlines. Duh!... ya think?


Friday, August 4, 2017

"Friendly Fridays... Franklin & South Manchester!"

What better way to kick off Volume II of the Old Main Line than with a visit to everyone's bucket-list layout?   George Sellios' Franklin & South Manchester in Peabody, MA, was on tap as part of a belated Father's Day weekend trip to Boston to see our little millennial. And as part of da-dee's festivities, wife and daughter happily joined in the half hour drive to a non-descript storefront on Main Street.

Anticipation mounted as we climbed the dark stairway to the second floor and then entered through a narrow hallway behind the layout's massive backdrop. But in turning the corner, the expanse of 23' x 42' cityscape revealed itself. The more than 600 detailed structures and extensive scenery was both breathtaking, but overwhelming too. Was I really here, finally? Where should I look first?


There's no mistaking the Sellios aesthetic of a dense and dilipated, depression era urban setting of exquisitely crafted structures.

The ladies were absolutely blown away by the scope and detail. They especially liked the 3-D scissor sign, but I noted George's nod to his childhood favorite, American Flyer Trains.

A deeply religious man, I'm betting that the paint company sign is one of George's little inside jokes. I also suspect that his use of ivy is not out of necessity like it is for many of us.

George says that he wore out the pages of MODEL RAILROADER and was most influenced as a young modeler by masters Frank Ellison and John Allen. He learned his lessons well.

Nothing hidden here... This is the way visible, sceniced staging is handled on the F&SM!

The entire layout is kept clean by its skirting which is pulled up and attached to hooks in the valence when not on display. George says that open houses create the most dust.

The detailed scenes never end. This is one of my favorite ones depicting the depression era. Three Stooges fans should note the tailor shop sign... more subtle than other structures like the not-pictured I.M. Boren Company or R.U. Bawnegan building.

George said that the F&SM has no access hatches even though it is very deep throughout. He relies extensively on the Topside Creeper to reach in, but also swears that he sometimes hangs from the supports above the dropped ceiling and works upside down. I still feel like he was pulling my leg on that one, but a religious man wouldn't do that to me, would he?

Here's a tenement row that would make Earl Smallshaw proud, complete with the requisite balconies and hanging laundry pushed up tight to the tracks.

Allegedly a Batman figurine is planted somewhere in the detailed layout which we could not find in person, nor in the 100+ photos that the three of us took. I assume that such a device is a good trick to help visitors focus on the micro rather than the macro.

Want to do eroded roadways and faded signage? Look and learn, people. Look and learn!

Whoa, wait a minute. What's that middle building doing here? Isn't that the old Atlas/AHM/Tyco Burns Engineering Company? Looks like George fancied it up with a scratchbuilt roof and customary debris. I reckon we can let him slide on this one.

Here's the man himself explaining how he does what he does. The former Minnesota Twins farmhand started Fine Scale Miniatures in 1966 and then the layout about 20 years later.

My pick up line, "Hey babe, wanna be in my blog?" went nowhere with this hot chick. "Better watch it," she deadpanned. "I'm married to a crazy man."  Ouch! That's harsh.

Gina, Kendall and I spent a couple of hours marveling at the workmanship and chatting with the shy craftsman. A proud customer of his brought in a completed diorama of the final FSM kit, I.M. Dunn coal yard. George studied it carefully, looking at it from different angles. The new retiree then proclaimed, "It's perfect... better than mine." High praise indeed!... and very classy.
 
The Franklin & South Manchester is open one Saturday morning most months. Photos are obviously allowed, as are smart-ass wives, but small children are not. Admission is $5.00. Afterwards, we concluded that two visits are really recommended. The first is just to get one's bearings and take in the overall scope. The second is when you can really relax and appreciate the individual scenes. We look forward to a return in the not-too-distant future... to find Batman!

But it was time to say goodbye and thank George for everything he has meant to the hobby. Now, on back to my daughter's north end neighborhood for a nice Italian meal and then one more stop that evening for another first. This was shaping up to be one heck of a day!

-30-
 
  BONUS:  JUST  ONE  MORE  THING  BEFORE  WE  GO ... 


Another bucket list item checked. Fenway Park and the Green Mon-stah on a beautiful summer night. And we got to see the ump toss Sawx manager John Farrell for a tirade that was wicked awesome.

Wednesday, August 2, 2017

"Wordless Wednesday... Numero Uno!"


 -30-
 
 
  BONUS:  JUST  ONE  MORE  THING  BEFORE  WE  GO ... 


Sunday, July 31, 2016

"Again?... A Sunday Morning's Rude Awakening."

An unwelcome text came in from our friend in Maryland early this morning with news and video of the overnight flooding in Ellicott City. Readers of this blog know that this has been a habitual problem for the area and it is what ultimately rendered the Old Main Line all but obsolete. 
 
The National Weather Service reported that more than six inches of rain fell in less than three hours. More than five inches fell within 90 minutes! It has been deemed, "a thousand year storm." 
 
The charming downtown is built on the side of a hill and its main street runs from top to bottom, punctuating with a meet at the Patapsco River. Higher hills on each side of Main Street funnel all water run-off onto it. This area, pictured in happier times, suffered significant damage.

Twenty four hours later damage was still being assessed. This stretch of Main Street is considerably higher  than the area adjacent to the Patapsco River. It did not escape harm.

News is still filtering in about the extent of the devastation. Two deaths have been reported so far. Our family is absolutely gutted, having visited this historic place so many times and always enjoying our interaction with the friendly residents and shopkeepers. Prayers!

BTW, for more photos of Ellicott City and its downtown architecture, see my post on selective representation.

UPDATE: August 1, 2016
Buddy David Olesen sent this update from the Washington Post. The videos emphasize the danger and helplessness that powerful, cascading water presents. The damage is such that there is now the very real fear that some of the historic buildings may not survive. EC will never be the same. So heartbreaking.
 
-30-
 
   BONUS:  JUST  ONE  MORE  THING  BEFORE  WE  GO...  


Friday, July 29, 2016

"Friendly Fridays... Cheshire Branch Revisited."

On one of several recent trips to Boston to help our college graduate settle into her "second floor closet with natural sunlight" in the city's historic north end, I had the opportunity to ultimately rendezvous with Jim Dufour and check on his progress. I hadn't visited in about three years and I was long overdue.

After a fortuitous meet at a nearby grade crossing, I arrived and we got right down to business... cold beers and gossip, plus a quick check of some workbench projects. But it was the work one level below that I was most anxious to see.

I have featured many images of the Cheshire Branch, some from my original visit, but many received via email, and I was excited to see the updates in-person. Aside from the expected rave reviews, one dominant impression struck me repeatedly. Jim's mainline 'rolled,' gradually climbing and descending around the layout, meeting at its run-through staging, despite his protestations that it was level.

"At least it's supposed to be," he pleaded.

Like my New Year's trip to Sykesville, I was one pick-up truck away from perfection as a CSX local rumbled by on the former B&M Worcester-Ayer line one block from Jim's residence. Alas, I did miss the motive power hauling a real assortment of graffiti-covered cars but there were some genuine blasts-from-the-past like this yellow one...
 
... and this blue one! (BTW, great prototype photo for aging roads.)
 
Jim's handiwork is exceptional and it comes from a modest table set up in his kitchen with nice sunlight. Here, my beer dwarfs the gas tanks for a fuel facility that he will be installing. Note the naked little people on the napkin that Jim is in the process of dressing.

The undulations of the terrain and the crossing lines of the track, road and river not only convey the impression that the railroad is not flat, it creates an illusion that the track is most definitely undulating itself.

I know that land forms built above and below track grade disguise the fact of a level railroad, but Jim's somehow goes beyond that, forcing the viewer to accept that the track is either gradually ascending or descending.

I got you now! I actually used my iPhone's level app to prove that this stretch north of  Troy was climbing. It wasn't.

We ran a couple of trains and I enjoyed the perceived rolling undulations. And then it was off to a local pub for New England clam chowder and a lobster roll. What else? But even over a nice meal, Jim couldn't explain how he had created such an illusion. I wish he could because I would like to steal it!
 
-30-

  BONUS:  JUST  ONE  MORE  THING  BEFORE  WE  GO... 


A photo may be deceptive, but it's just as deceiving in person. C'mon now, tell me that the track isn't gradually climbing as it weaves through the cuts and curls around the end of the peninsula in the foreground.

Thursday, June 9, 2016

"Just what the doctor ordered... 500mg of Fukitol!"

If you read Marty McGuirk's Central Vermont Railway blog, then you already know about Randy Laframboise's Rutland Road presentation at the recent NERPM... and his reliance on 500mg of Fukitol in designing and building his very large multi-deck layout with Mike Sparks. (So, that's how they do it!)

But that was just one of the many humorous, yet insightful,  moments presented at this annual event. In that vein, Mike Rose detailed how he can delicately fine-tune benchwork with a reciprocating saw and Kip Grant showed his radio roots by imitating the sound of an RS-3 in start-up mode. And of course, there were no shortage of wife anecdotes from various presenters that gave support and comfort to a room full of basement-dwelling model railroaders.

Several hundred attendees had 3-4 clinics to choose from in each of the seven slots from early morning through late evening this past Friday and Saturday. Here Neil Schofield discusses his latest layout and some quick scenery techniques to a rapt audience.

Marty McGuirk presented a nice piece on his latest layout efforts focusing especially on fall scenery and backdrops. He recounted that several areas have been redone on multiple occasions. (Music to my ears!) Plus, I got to finally meet Marty face-to-face after several years of only  on-line communication.

Who knew there was such a story about those two nuns loitering in downtown Sonnyvale on Kip Grant's D&H branchline? In addition, he recounted a story of a modeler who had seen his GMR 2011 article and called to ask for a visit. "Hi Kip, you don't know me, but my name is Dick Elwell..." Good stuff!

Moving the meet from the senior citizen's center in Collinsville, CT to the Holiday Inn in Enfield, CT provided many advantages, not the least of which was a larger room for vendors and model displays. This photo captures about one half of the space which was filled with plenty to gawk at between clinics. Truth be told though, the lighting could have been better in this room. Or is that my age rearing it's ugly head?

A tremendous amount of motive power and rolling stock was on display illustrating various talents in building, modifying and weathering including Butch Eyler's graffiti-filled goodies. Fellow bloggers Ryan Mendall and Pierre Oliver, plus Jered Slusser, had similarly very nice displays which my terrible photos unfortunately do no justice.

This HO scale scratchbuilt structure was the unofficial fan favorite of the meet and builder Ron Poidomani's presentation explained his process from design to finishing details, including interior  LED lighting  and weathering techniques. It is breathtaking.

I regrettably missed this clinic in order to heckle Kip Grant in his, but heard that it was very well-done. Likewise, I had to attend Jersey buddy Ted Pamperin's C&O New River Division in lieu of Chris Adams' presentation on his New Haven branch line. Decisions, decisions!

And of course food was a highlight, although I did not expect braised short ribs, truffled mac and cheese and fresh asparagus washed down with some local IPAs. This certainly beat a burger and beer, four-fold, which was about the cost ratio.
A word of thanks and congratulations to Dave Owens and his crew at the NERPM. A great time and wonderful event! What I've presented is just a fraction of the weekend's events. So many other clinics and model displays could have been covered here, but I'm certain that they will be in other blogs, websites, etc. Click on the above for photo galleries.
 
And a sincere thanks to my roomie, Jim Dufour, who shared great banter and some real neat discussion about theory and philosophy in constructing his prototype. His presentation on detailing the B&M's Cheshire Branch was a highlight. The NERPM is just few miles down the road from the annual Springfield show. If you can get to this region for that, you should do the same for this event. You'll be happy that you did. Cheers!
 
-30-
 
   BONUS:  JUST  ONE  MORE  THING  BEFORE  WE  GO...  
 
Although I'm not quite ready to pull a George Costanza and declare, "I'm back, baby," the NERPM was a needed shot in the arm for me and hopefully will get me going again. Just what the doctor ordered!