Showing posts with label Infrastructure. Show all posts

Wednesday, August 8, 2018

"Wordless Wednesday Wrap-up... Numero Uno"

My relative reluctance to embrace the often-used feature, "Wordless Wednesdays," that many bloggers employ may have been evident in that I dipped my toe into the shallow end by running a photograph of ... words. But while I may have had my tongue firmly planted in cheek, I should provide an explanation of that signage, since I'm always asked about it... even if it is a year later!

It's a sign that I made from some scraps that I had in the garage, most specifically old fence pickets that had been out in the weather for many years. When we replaced some sections of our 6' stockade style fencing, I saved a few pickets just in case I needed some here and there in the future. Well, the future has rapidly rushed by and at this point the next act regarding several hundred feet of fencing will be a total replacement. So little pickets, come to poppa.


The homemade sign measures just under 8" x 60" and graces the more visible side of my workbench. It was designed and built quite quickly out in my garage workshop from entirely on-hand materials, with the exception of the letters.


I showcased the real imperfections of the pickets for 'character and realism.' The 3-1/2" high wood letters were purchased at Hobby Lobby and given a spray of flat black before being glued in place. I chickened out when considering whether to distress them.


I ran each of the four pickets down my table saw, ripping off the rounded face so three would lie flat against a 1/4" hardboard backing for easy gluing and screwing. The fourth was then  further ripped into a suitably proportioned surrounding frame. The backside of each picket is what is actually visible.


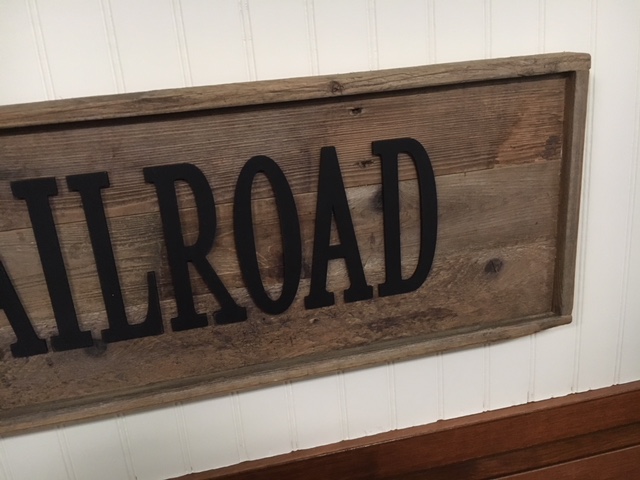
Any clean edge of the frame that had been ripped on the saw was given an alcohol and ink wash and blended with the twenty year old fencing better than I could have hoped. 

Full disclosure here. I had originally planned to wash the background in white and the surrounding frame in black to more closely approximate a depot sign, but I decided against it for two reasons. One is that I really liked how this looked as is, especially in contrast against my workbench wall. And two is that I really, really didn't want to screw this up trying to weather and age at a 1:1 scale!


Overall though, I'm pleased with the result and the ambience it contributes to the train lounge. I have built a second, similar one from my last remaining pickets and am contemplating how to finish that, including lettering. But I promise to be more adventurous with that one whenever I do get around to it.

-30-

  BONUSJUST  ONE  MORE  THING  BEFORE  WE  GO... 


Oooops!... seems that some careless CSX track construction caused flooding in this lovely historic town twice within a week. At least it's not on the order of Ellicott City's woes further down the line.
 

Wednesday, August 2, 2017

"Wordless Wednesday... Numero Uno!"


 -30-
 
 
  BONUS:  JUST  ONE  MORE  THING  BEFORE  WE  GO ... 


Friday, April 1, 2016

"One year anniversary... and the need for speed!"

Well, one full year with the blog, and my critically definitive review is, "Meh." My goal was to present well-written, entertaining and informative pieces on model railroading in an attractive format. But with an average of less than one comment per post, stagnant membership and declining viewership (except in France!), I have to be honest and acknowledge something less than success... although it was a good creative outlet and a fine way to document my missteps in attempting to build a layout. Stuff happens. Nothing ventured, nothing gained. Blah, blah, blah.

I am fortunate however, that a really neat hobby shop is right here in my town specializing in slot car racing, which may be more my speed, so to speak. NJ Nostalgia Hobby is an institution in the slot car community and racing nights are not all that different from operating sessions. Just faster, friendlier and much more inclusive. The store's track is nice, but I am installing a more significant one at home, necessitating some big changes in the basement. We started this week.

The store's track is about 5' x 16'. I'm installing one that will fill my 15' x 35' 'finished' area where my lounge, office and workspace had been. They have all been moved to an empty bedroom upstairs. The current train room will remain as is, at least for the time being.

Anyone who has ever visited, knows the 6'-3" ceiling height is problematic. So to negate that and add overall resale value to our home, we are replacing the existing slab floor with one that is 14" lower. I took a day to gut the room and then had a crew come in to begin excavation. In this shot, some wall framing and the baseboard heating units sit in dust awaiting removal to the dumpster. Several neighbors will be using much of the crushed concrete for dry well's in their backyards saving me considerably in disposal costs. Nice!

It's a noisy, dusty job, so my wife and the pups visited the in-laws on eastern Long Island for a few days. I am reminded that a client of mine did this in his old Victorian to create a nice basement play area for his kids. It came out great! But the real genesis for this came from a casual comment from a buddy about an issue I had detailed in an earlier post here.

The trickiest part of the entire job is the initial chipping away of the slab that sits atop the foundation footing. Once that is done, excavating commences and a new footing is poured to undercut the original one. I am fortunate that we have a bulk head exit so all materials and debris could easily be transported, relatively speaking. The sunken 14"  area will be accessed by two 7" steps. Can't wait to frame and sheetrock the walls!
 
So, that be that. The railroad was probably a tough ask for a first-timer like me, with no right-hand man, no experienced wing man, or go-to guy to help with the myriad of questions that I had at every step. Not sure what will happen in the train room, but right now I want to race... and I definitely won't be blogging about it. Well, probably about time to hand in the ol' NMRA card and save a few bucks. RPM has a whole new meaning now. Be well everyone. It's been real.
 
-30-
 
   BONUS:  JUST  ONE  MORE  THING  BEFORE  WE  GO...  
 
 
Sweeeeet, and no PanPastels needed!... BTW, look out for fools who may prank you this April day. Don't you just hate those guys? Cheers!

Saturday, February 27, 2016

"Annoying tasks... and life's little victories."

There were a number of projects that I had been putting off, but absolutely had to address prior to laying track. The time had come to man-up. I wasn't looking forward to any of these because they were either frustratingly redundant, annoyingly messy or inevitably tricky... with the real chance of real damage.

The entire backdrop had taken a beating from the installation and removal of the upper deck. Patched screw holes and various marks and gouges were touched up and the result was a blotched backdrop. Attempts to feather the discolorations into a varied sky only exacerbated the issue. A new coat of the entire backdrop was required, and completed. Job one, annoying, but easy and done.

But the bigger tasks awaited. Because the bench work was built at a uniform 20" depth, it ultimately did not provide the necessary space required for one of my Layout Design Elements. But simply extending the bench work wasn't the issue. The lighting system  had to follow the edge of the bench work. So despite my earlier claims that I was never, ever again going to address the lighting assembly, there was no avoiding it. I did have a plan. In theory, it should work. Let's see.


With the freshly painted backdrop complete, the repositioning of a 12' length of lighting was taken on. Two sections of valence were carefully removed and short lengths of wiring were unclipped in each corner to create some slack.

The 12' length of 1" x 3" was disconnected at the corners from its counterparts, the ceiling clips were loosened and the entire unit was slid forward by about 5" until the clips hit a cross-member of the grid system. The now-excess  frame and rear reflective valence had to be cut in place using a circular saw, held upside down without damaging the ceiling grid.

The 1" x 3" frames were reconnected in each corner, the reflective rear valences were reinstalled, the corner light bulb was repositioned and excess wire was looped. No way was I pulling the cable tight by repositioning more than two dozen sockets. Good ee-nuff!

The bench work below was then extended by 7" along the 12' length with two identical 6' long 1" x 3" grid frames fabricated from my disassembled helix frame. They were generously screwed together to create a 27" deep foundation for the Ellicott City area.

Because there was slight deflection at the joint of the grid sections, additional 27" long 1" x 2" lengths were 'sistered' under each cross member creating a more rigid arrangement. Alas, there is no shortage of 1" x 2" lumber on hand  from the former second deck. Even with the 7" extension, the aisle is still a comfortable 32" wide opposite the end of the peninsula.
 
To untrained eyes, like those of my wife and daughter's, it may appear that no progress has occurred. But I can readily attest that seldom has the appearance that nothing has changed been so rewarding. As annoying as everything was, the tasks got done with no real complicating issues. No damage, no injuries and a minimal amount of cussing. The valence was trimmed and reinstalled with no need to touch it up. Victory!... but seriously, I really am so sick of sawdust.
 
-30-
 
   BONUS:  JUST  ONE  MORE  THING  BEFORE  WE  GO...  
 
The crew did lend moral support... while awaiting their puppy chow.


Saturday, January 30, 2016

"Forecasts are like layouts... subject to change!"

Aided by warming temperatures, we have finally dug out from the recent blizzard. Somehow weather models continually showed that our region would get between 8-12" of snow right up until we had actually gotten 8-12" of snow. Then, forecasters adjusted the likely totals to 18-24". Ultimately, television news reported that my town in north central New Jersey got 28 unexpected inches of the white stuff. Not exactly spot-on. Weather forecasters to the public, "Our bad!"

But the unexpected is very expected in our hobby. We all know adjustments, revisions and the like are an ongoing adventure when it comes to track plans and other design issues. So I used last week's snow day to finally take on a task of which I was not particularly excited... mounting my flat screen to the wall to accommodate plans for a once-and-for-all revised staging area.

The flat screen was raised nearly a foot when detached from its base and mounted to the wall. Staging can now utilize both ends of the 18' wall at 46" high and 18" deep. The bureau will be relocated to another part of the room. New benchwork will mimic that from the layout room and hold the various A/V boxes with all wiring being concealed. 

A view from an earlier post on my new workbench shows the former position of the flat screen. Viewing from all three of my work stations is now enhanced as an added bonus.

The actual mounting was tricky, but I won't bore with the details. Suffice to say that nothing is as easy as one would hope. Eventually I did get the flat screen positioned and it continues to stay in place! Its final positioning has now determined my track height of 46" and the location of a wall penetration.

Much more on this as we go forward. For now, risers are being re-installed on the benchwork and a track plan is being prepared for a post that will better detail staging. See you shortly.
-30-
 
   BONUS:  JUST  ONE  MORE  THING  BEFORE  WE  GO...  
 
Remember our lesson for the day, boys and girls. Mulligans exist not only in golf, but in weather forecasting and model railroading.

Wednesday, November 4, 2015

"An organized workspace to call my own..."

As part of my recent pillaging and organizing, I was determined to set-up a full-time work station that would blend into the finished part of the basement, and do so using as many components that were already on hand. Two file cabinets, two hollow-core doors, some left over bead-board from household projects and 1" x 2" framing from the former upper deck did the trick. Throw in an extra extension lamp from my drafting table and plastic bins saved from our favorite take-out restaurant and I was in business. Only some cheap plastic letter holders needed to be purchased, plus a chair mat to protect the carpet.

The hollow core doors were stained and coated with several coats of urethane. One serves as the desk top while the other serves as a screen for the lower portion. They were attached to the file cabinets with heavy duty Velcro squares, so the entire assembly can be taken down quite easily. The bead-board surround is screwed to the desk top from below.

The view from the stairs upon entering the basement won't be affected by a cluttered workbench while projects are in progress. The entry to the train room is to the immediate left. The former helix yielded to a new lounge configuration and allowed for the workbench.

The work enclave is segregated from the rest of the finished basement and includes my library, drafting table, computer area and workbench. The left-over bead-board gives a nice railroady touch, but I'm not sold on the color. We'll see, but it is just the basement!

Weeee!... I can swivel my chair back-and-forth between my workbench and computer.

Most importantly, I can see the TV from the workbench! The flat-screen will be raised and mounted to the wall with an extra mount that we have on hand. Note the power strip, recovered from a 'computer stuff' storage box. It provides needed outlets for my work tasks.

The key to organizing and storing my tools, parts and materials are these plastic containers from a local take-out eatery. The larger one measures about 6" x 9" x 2-1/2". The smaller one is about 4-1/2" x 6" x 2". I've saved in excess of  50 through the years.


Serendipity! Two containers fit perfectly into each letter tray. BTW, even the peel-and-stick lettering was on hand from long ago art projects. The 1" lettering might be overkill, but it's what I had and someday might be appreciated by aging eyes. You may not understand the labels, but I do. I had to get creative based on what was available and what would fit!

I'm pleased with the revamped man cave. It suits me for all of my own personal uses and provides a great lounge for railroad guests as well as for Garden State Division board meetings. The workbench is a major upgrade over my previous use of a table that served multiple family needs, but it does still need a little fine-tuning. I'll be adding some storage for all of my styrene and wood strips with stacked PVC tubing which is currently stored in my garage. More consolidation, more pillaging and more organization! I'm lovin' it.

And I'm about done with two track plan variations for the single deck layout. I'll get those drawn up nicely for review shortly.
 
-30-
 
   BONUS:  RHETORICAL  QUESTION  OF  THE  DAY...  
 
 
Can you identify this location?  (Really big hint: Trains are caught here regularly. Baseballs?... not so much!)


Thursday, April 9, 2015

"A little bit of each... Blood, sweat and tears."

As the summer weather of 2013 took hold, the basement grew warmer and messier. There was no shortage of sweat during some of the heavier work and there were more than a few bumps, cuts and bruises. But somewhere along the way, it dawned on me, "For crying out loud. What if Dave and Ted were pulling my leg! They wouldn't do that, right?... RIGHT?"
 
Paranoia aside, I was actually progressing well unbeknownst to the two trouble-makers. They had no idea that I had actually embraced their bold suggestion.
 
Awaiting some final tweaks from the electrician, the framing is complete, including an unusual, but necessary configuration around the lolly column immediately against the entry. The floor still needs some work, but that will be completed after I sheetrock. 
An obligatory sheetrock photo, with floor tile in place, awaiting molding and then priming and painting. The proverbial light at the end of the tunnel.
Here's the finished product with the television moved a few feet over. It's OK, but most importantly, it was not a change that would one day come back to haunt us as a detriment to selling our home. It looks logical.
A view from the layout side awaiting final trim work.
A finished view shows a cleaner entry than the original corner one.


Not too exciting, but a part of the project I was not looking forward to and rather pleased how it turned out.

Carpet trimmed out, tile cut and glued awaiting grout, sealing and molding.

"One step back for two forward." That's what I kept reminding myself throughout this process. Once done, I was thrilled and certainly glad that I did it. But then I remembered that there was some work to do closing off the former entry. Oyyy.

We'll look at that project in a few days, but tomorrow is a special treat in our 'Friendly Fridays' segment. See you then.
-30-

  BONUS:  RHETORICAL  QUESTION  OF  THE  DAY...  
 
True or false? The author is thankful that two friends cared enough to offer their honest opinions and is most appreciative of their advice.


Wednesday, April 8, 2015

"Mr. Gorbachev... Tear down that wall!"

I was excited to have friends Dave Olesen and Ted Pamperin visit to see the layout's progress. Things had been going very well with construction and I was pleased with my overall timeline. Tally ho. Onward and upward!

I'm not certain about their political leanings, but Dave and Ted were a couple of Ronald Reagans on this day. After assessing the bench work, discussing track configuration and talking about potential operation we adjourned to a local pub for lunch. It was here that they convened their modeler's intervention. 

They gently confided that each had independently come to the same conclusion. My current entry was not ideal for a myriad of reasons and that I should consider 'moving it' to the television's location! "Consider it my ass," I thought. I ordered another round of drinks. "Make mine a double!" (I was having beer).

The central part of the finished basement was my TV lounge. By that evening my wife sensed I was rather glum over the visit. She advised that I should heed whatever constructive criticism I may have gotten from such veteran modelers. Really? Hmmmmmm. Guess that's why I already had marked the floor with some painter's tape!
Growing more curious, I marked the locations of my bench work and  a lolly column, giving me  a 24" opening for a new entry. Of course that's exactly where an electrical outlet and a cable connection were located. I wondered if there might be any surprises behind the wall.
I opened a small hole that could easily be patched and was encouraged to only see vertical elements including all wiring. This was good. I was pretty accurate with my locations, but I was approaching the point of no return. What to do?
As if there was any doubt once this seed was planted, I moved forward only to find that which I feared... horizontal wiring, PLUS a buried electrical box. This would require calling in a professional at the expense of time and money.
Meanwhile, here is the layout side pre-demolition. Not only would the bench work need to be altered, but I had to change the lighting and valence, plus match a tile floor to a carpeted one and a dropped grid ceiling to a sheet rocked one. But I just want to run trains!
Here's the breakthrough, but I quickly realized that cutting out the base plate without damaging the adjacent floor surfaces would be very tricky. But I had no choice other than to proceed as the electrician would soon be on his way.

That's about all I can bear to post for now. We'll pick up with the conclusion tomorrow and see some re-construction photos. And as my wife, the lovely Senior VP proudly said, "Hey, you didn't screw anything up and no one got hurt."

-30-
 
  BONUS:  RHETORICAL  QUESTION  OF  THE  DAY...  
 
How often did the author think of his two mates during this task?
A) Every day      B) Every hour      C) Every minute      D) #*@%$#&*!@

Monday, April 6, 2015

"A deal I couldn't refuse... Jersey style."

Lighting the layout room was proving to be a real challenge because of it's 6' - 3" clearance and tight ceiling grid that crisscrossed with the ceiling joists. Drop-in lights for the 24" square grid system would not clear the joists above, while recessed cans would not provide much of a 'cone' before reaching the layout surface about 24" away. And any kind of surface mounted fluorescent fixture would only exacerbate the potential for head knocks. Plus two years ago, LEDs were still a bit of a mystery to me, so I was flummoxed.

Enter fellow Jerseyan Ted DiIorio. "Pssst, have I got a deal for you," he whispered one dark dreary night. Looking to limit the damage from purchasing something he wasn't going to use, Ted offered a 48' long string of Party Lights that I could have at his original cost. But he would throw in 24 CFLs for free. Done deal. Now I just had to design a mounting and valence system.


I utilized the grid ceiling system's clips that typically are used for holding flush-mounted lighting fixtures. I routed out 1" x 3" strips that would hold both the Party Lights and hardboard valence to accept the clip. I then carefully followed the bench work edge around the room and peninsula. A close-up of  Ted's contribution is below.
 
 
The Party Lights which are typically used for outdoor events have their own mounting ears, but I opted to use cable clips for easier installation. The sockets are spaced at 2' intervals. I bought a second 48' length online to complete the required run around the room and peninsula. They are not made to connect together like Christmas lights. Each is plugged into a ceiling mounted outlet that is hard wired to a light switch.
Here's an overall  work-in-progress view looking back at the entry. The lighting is installed onto the 1" x 3" support awaiting the attachment of the 8" deep 1/8" fully tempered hardboard valence. I'll prime and paint the interior side off-white while the exterior side is getting a deep charcoal gray
 
Viewed from the entry, we see the valence and its shiny bolts (something for rivet counters to count). They were eventually replaced with smaller ones and painted to match the valence. But wait, somehow the peninsula backdrop was fabricated between this photo and the one above! We'll  take a look at that more closely in the next few days.
Uh oh... Looking down each side of the peninsula reveals the mounted lighting and its wiring. I'm not thrilled with the aesthetic. From what I've seen at other layouts, this is a typical condition that isn't easy to avoid, but I did want to minimize the visual impact.


I repositioned the lighting mounts  from the inside edge of the 1" x 3" support to its flat face and then mounted a 4" deep interior valence to hide the black wire while still getting maximum lighting. It's an improvement and probably all that's warranted.

I'm very pleased with the quality and color of this system. The 40 CFL's that I used are almost all 14 watt (60 watt equivalent) except for a few corner locations where I used 19 watt (75 watt equivalent). All are 5000K and nicely gray down the backdrop which is much lighter in person than it appears in these photos.

But this bullnose peninsula backdrop is not working for me. Wonder if there will be changes in the future? (Hint, hint). But for tomorrow, an exciting Shakespeare tutorial! I know I can't wait.
-30-
 
  BONUS:  RHETORICAL  QUESTION  OF  THE  DAY...  
 
True or false? A more efficient, less expensive and nicer looking lighting system will be available shortly after the author has completed the installation of this one.

Thursday, April 2, 2015

"I report to absolutely no one... Almost no one."

As the household's Director of Real Estate Acquisition and Development, I supersede all family members, including pets, with the exception of my wife, the Senior VP of Real Estate Distribution and Utilization. And while she has little interest in spending time in our lovely remodeled basement, the Senior VP still only deemed a 15' x 21' dedicated room as, "the place for the trains."

I considered various footprints through sketches, full-size brown paper templates and a 1" = 1'-0" study model. Not wanting to reinvent the wheel and with such givens as easy reach-in, ample aisles and maximum point-to-point run, I settled on the trusty around-the-walls-with-a-peninsula design in a single deck format. I would live with the annoying entry gate if final staging plans mandated it.

Building the study model actually helped me brush up on my eye-hand coordination for modeling purposes since it was about 35 years since I was actively involved in the hobby! The door on the back wall is the entry from the main basement area and is immediately adjacent to the stair. The door along the side wall goes to a 4' x 11' walk-in closet referred  to as the wine cellar. It holds everything but wine.

It should be noted that when six railroad friends visited to help with potential track arrangements, their undivided attention chaotically turned to the adjacent spaces. They scattered gleefully like pre-schoolers at an Easter egg hunt. Their identities shall remain confidential... for the time being.
 
The areas that caused such bedlam included a fully finished 8' x 21' laundry room, a semi-finished 8' x 24' utility room, a 4' x 11' walk-in-closet and the 15' x 35' man cave. That large area houses my home office, television lounge and modeling work area. But alas, these six models of decorum were no match for the Senior VP who naively showed little appreciation for either staging or dispatch. 
 
The dedicated room was fully finished including a dropped ceiling to minimize dust while still providing access to plumbing and electrical. Because the ceiling joists were only 6'-5" above the floor, the system grid was installed as tight as possible leaving a final clearance of 6'-3". Not great for some of my guests, but livable for me at 5'-11" and shrinking fast.

The room was neatly sheet rocked and prepped for the layout with a ledger strip located 42" high to help hold the bench work as I installed it. The temporary brown paper valence was positioned as I experimented with some lighting ideas. The hard porcelain tile floor only looks unforgiving for aging backs and knees.
 
That's it for now. More later this weekend on the Old Main Line's route across Maryland and the 20 mile portion that I'll be modeling. But tomorrow, we'll be bringing you something completely different. Stay tuned.
 
-30-
 
  BONUS:  RHETORICAL  QUESTION  OF  THE  DAY...  
 
In truth, the author recognizes that the lovely Senior VP's decision is:
A) Very appropriate    B) Very wise    C) Very fair    D) All of the above